
Starting an online store without a logo is like showing up to a job interview in pajamas, you might have the skills, but first impressions matter. If you’re launching on Shopify and need a professional-looking logo without hiring a designer, a Shopify logo maker can get you started in minutes.
These free tools use templates and AI to generate logos based on your industry, style preferences, and business name. They’re ideal for new store owners who need something polished before their first sale. But like any automated tool, they come with trade-offs worth understanding before you commit your brand identity to an auto-generated design.
At Dr. Tee’s Design & Screen Printing, we work with Kansas City business owners every day who need their logos reproduced on apparel, uniforms, and promotional materials. We’ve seen what makes a logo print-ready and versatile, and what causes headaches when it’s time to put that design on a t-shirt or embroidered polo. This guide walks you through using Shopify’s logo maker effectively, so you end up with a design that works across your store and beyond.
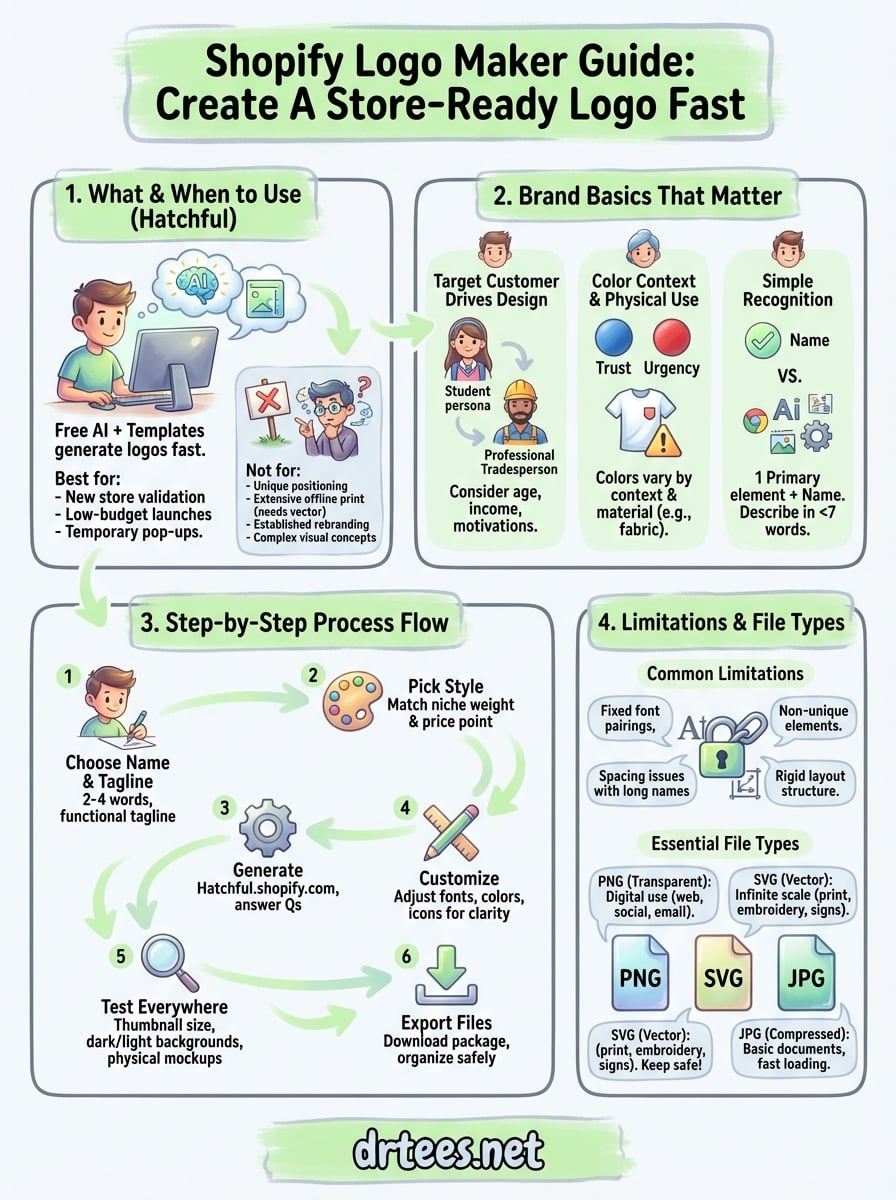
What Shopify logo maker is and when to use it
Shopify’s free logo maker, officially called Hatchful, generates logo designs based on a short questionnaire about your business. You answer questions about your store name, industry, and visual preferences, then the tool produces multiple logo variations using its template library. Each generated logo includes different layouts, icon options, and color schemes you can customize without design software or technical skills.
What Hatchful actually does
Hatchful uses pre-designed templates matched to your industry and style choices. When you select “outdoor apparel” as your category and “bold” as your aesthetic, the algorithm pulls from templates tagged with those attributes and swaps in your business name and chosen icons. The tool doesn’t create anything from scratch; it assembles existing design elements based on your inputs.
You get access to dozens of logo variations in a single session, each using different icon placements, text arrangements, and color combinations. The interface shows these options side-by-side so you can compare how your store name looks in different fonts and layouts. Customization happens after you pick a base design, where you can adjust colors, swap icons, and modify text without starting over.
The real value is speed. You can generate, customize, and download a complete logo package in under 15 minutes.
When a free logo maker makes sense
New store owners testing a business idea benefit most from tools like the Shopify logo maker. If you’re validating demand before investing in professional branding, a free generated logo gives you something presentable while keeping costs near zero. You can always upgrade to custom design once your store proves profitable.
Low-budget launches where every dollar counts make sense for template-based logos. Spending $500 on professional design might not be realistic when you’re bootstrapping inventory and marketing costs. A free logo lets you allocate resources to product photography, ads, or initial stock instead of upfront branding expenses.
Temporary or seasonal stores don’t need logos built for decades of use. If you’re running a six-month pop-up or testing a holiday niche, template logos work fine because you’re not building long-term brand equity. The design just needs to look professional enough to avoid hurting conversions during your test period.
Situations where you need a logo within hours rather than weeks push you toward automated tools. Professional designers typically need one to two weeks minimum for initial concepts and revisions. Hatchful delivers finished files in the time it takes to drink a coffee.
When you need more than a template
Unique positioning requires custom design work. If your competitive advantage relies on standing out visually or conveying specific expertise, template logos built from the same icon library as thousands of other stores undercut that positioning. You need design elements competitors can’t replicate by clicking through the same tool.
Stores planning extensive offline presence face practical limitations with generated logos. Business cards, vehicle wraps, embroidered uniforms, and building signage require file formats and quality levels that free tools may not provide. At Dr. Tee’s Design & Screen Printing, we regularly work with clients whose logos need vector files for embroidery digitization or specific Pantone colors for uniform consistency across garment dye lots.
Established businesses rebranding shouldn’t rely on template tools either. If you already have customers, changing your logo affects brand recognition and trust. That decision deserves strategic thinking about color psychology, competitor differentiation, and visual consistency across touchpoints. Template generators can’t account for your existing market position or customer perception.
Complex visual concepts that templates can’t handle push you toward hiring designers. If your logo needs to incorporate specific imagery, tell a visual story, or work within unusual constraints, automated tools lack the flexibility. You’re limited to what’s already been designed and categorized in the template library.
Before you start: brand basics that matter
Your logo needs to work harder than just looking good in your Shopify header. It appears on product packaging, social media profiles, email signatures, and printed materials where design flaws become obvious fast. Before you open a Shopify logo maker, understanding what makes a logo functional saves you from rebuilding your brand identity six months later.
Most new store owners jump straight into design tools without defining who they’re designing for or what visual message actually supports their business goals. The result looks fine on a screen but fails when customers see it on a business card or embroidered on a uniform. These three brand basics determine whether your generated logo strengthens or weakens your store’s credibility.
Your target customer drives design choices
Design decisions that appeal to budget-conscious college students repel luxury buyers, and vice versa. A logo targeting professional tradespeople needs different visual weight and typography than one aimed at crafty DIY hobbyists. Before picking colors or fonts in the Shopify logo maker, write down your primary customer’s age range, income level, and buying motivations.
Your industry and niche add another layer. Outdoor gear stores benefit from rugged, adventure-focused aesthetics with earth tones and bold sans-serif fonts. Beauty products lean toward elegant script fonts and softer color palettes that communicate care and refinement. Mismatch these visual signals and customers question whether your products match their expectations.
The fastest way to undermine trust is looking like you’re targeting someone else’s customer base.
Colors mean different things in different contexts
Red signals urgency in retail but can read as aggressive or cheap depending on shade and surrounding elements. Blue conveys trust and professionalism across most industries, which explains why half of corporate logos use it. Green works for eco-friendly, health-focused, or outdoor brands but looks out of place on tech accessories or luxury fashion.
Consider how your logo colors translate to physical products and uniforms. At Dr. Tee’s Design & Screen Printing, we’ve printed thousands of logos where colors that looked great on screen created problems on fabric. Neon colors don’t embroider well. Light pastels disappear on white shirts. Dark colors on dark garments require extra design steps that template logos rarely account for.
Simple beats clever for recognition
Logos stuffed with multiple icons, gradients, and decorative fonts fall apart at small sizes. Your Shopify favicon displays at 16×16 pixels, where intricate details become muddy blobs. Text needs to stay readable when your logo shrinks to one inch wide on a pen or embroidered patch.
Strip your concept down to one primary element plus your store name. If you can’t describe your logo in seven words or less, it’s too complicated. McDonald’s uses golden arches. Nike uses a swoosh. Your template-generated logo should be equally direct.
Step 1. Choose your store name and tagline
Your store name and tagline form the foundation of what Shopify logo maker generates. The tool builds every design variation around these exact words, so getting them right now prevents redesigning your entire brand later. You need a name that’s memorable, searchable, and fits on physical products without awkward line breaks or unreadable text compression.
Write your store name for recognition, not explanation
Keep your store name between two and four words maximum. Single-word names work best for logos because they scale down cleanly and don’t require complex text arrangements. Multi-word names need careful spacing consideration; “Kansas City Coffee Co.” fills more horizontal space than “Brew Lab” and limits your layout options in the Shopify logo maker.
Test your name at different lengths before committing. Type it in all caps, title case, and lowercase to see which version looks balanced. Some names like “OUTPOST” gain visual weight in capitals, while others like “Luna Threads” lose readability. Your logo will display these variations across your store, so pick the capitalization style that maintains clarity at thumbnail sizes.
Avoid numbers, ampersands, and special characters that complicate reproduction. “Smith & Sons” creates embroidery digitization issues when we convert logos to stitches at Dr. Tee’s Design & Screen Printing. The ampersand requires extra thread colors or gets replaced with “and,” which changes your brand name’s appearance on uniforms and promotional items.
Keep your tagline functional or skip it entirely
Taglines work when they clarify what you sell for first-time visitors who land on your store without context. “Handmade Leather Goods” tells shoppers exactly what to expect. “Crafting Dreams Daily” sounds nice but communicates nothing useful. Your tagline should answer the question “What does this store actually sell?” in five words or fewer.
Consider where your tagline appears beyond your logo. Shopify logo maker includes taglines in some layout options but not others. If your tagline provides critical context like “Custom Pet Portraits” or “Industrial Safety Gear,” make sure it displays prominently. Decorative taglines that just add visual clutter should be left out entirely.
The clearer your name and tagline communicate your niche, the less explaining you’ll do in product descriptions.
Here’s what works for different store types:
Physical products: Include product category in tagline (“Organic Dog Treats,” “Minimalist Watches”)
Services: Specify what you do (“Mobile Detailing,” “Virtual Bookkeeping”)
Handmade items: Highlight your unique process (“Hand-Poured Candles,” “Custom Woodwork”)
Niche audience: Name who you serve (“Gear for Van Life,” “Plus Size Activewear”)
Step 2. Pick a style that matches your niche
Shopify logo maker asks you to select a visual style before generating designs. This choice filters the template library to show logos that match your aesthetic preference, but picking the wrong style creates disconnect between your logo and what you actually sell. Your style selection should reinforce customer expectations for your product category, not just reflect personal taste.
The tool typically presents style options like modern, playful, bold, elegant, or minimal. Each category uses different icon types, font weights, and layout approaches. Modern styles favor clean sans-serif fonts and geometric shapes. Playful styles include rounded fonts and illustrated icons. Bold styles use thick typography and high contrast. Elegant styles lean on script fonts and refined spacing. Understanding what each style communicates helps you avoid visual mismatches that confuse potential customers.
Match visual weight to your product category
Heavy industries and durable goods need bold or strong style categories with substantial font weights and solid shapes. Construction supply stores, automotive parts shops, and industrial equipment retailers benefit from logos that look sturdy and dependable. Thin, delicate fonts undermine credibility when you’re selling products designed to withstand physical stress.
Fashion, beauty, and lifestyle products work better with elegant or minimal styles that communicate attention to detail. Skincare brands, jewelry stores, and home decor shops need visual refinement that suggests quality and care. Bold, blocky logos make these products look cheap or mass-produced.
Your logo’s visual weight should match the physical or perceived weight of what you’re selling.
Children’s products, party supplies, and creative services call for playful styles with friendly, approachable elements. Toy stores, craft supply shops, and kids’ clothing retailers need logos that feel fun and inviting rather than serious or corporate. Skip playful styles entirely if you sell professional services or B2B products where appearing too casual damages trust.
How design styles signal price points
Budget-friendly stores benefit from modern or bold styles that look clean and straightforward without ornate details. Discount retailers and value-focused brands should avoid elegant styles that set expectations for premium pricing. Your logo needs to promise the shopping experience customers will actually get.
Premium and luxury brands require elegant or minimal styles with sophisticated typography and ample white space. If you’re positioning products at higher price points, your logo must justify that premium through visual refinement. Bold, busy designs make expensive products look like they should cost less.
Mid-range stores have the most flexibility with modern styles that balance professionalism and accessibility. These designs work across most industries without over-promising luxury or under-selling quality. Modern styles adapt well to both digital and physical applications, which matters when your logo appears on everything from screen headers to embroidered uniforms.
Step 3. Generate logos with Shopify Hatchful
Hatchful lives at hatchful.shopify.com and works without requiring a Shopify account or any software installation. You access the Shopify logo maker through your browser, answer a series of questions about your store, and the tool generates complete logo packages within seconds. The entire process from start to download takes less than ten minutes if you’ve already decided on your store name and visual style preferences.
Access the tool and start your project
Navigate to hatchful.shopify.com and click the “Get Started” button on the homepage. The tool asks for your business name first, so enter exactly how you want it to appear in your logo. Use proper capitalization here because Hatchful preserves your formatting in the generated designs. If you type “blue ridge outdoor,” your logos will show that exact lowercase styling rather than “Blue Ridge Outdoor.”
Next, select your business space from categories like Fashion & Accessories, Food & Drink, Home & Garden, or Sports & Fitness. Pick the category that best matches your primary product line. This selection determines which template groups Hatchful pulls from, so choosing “Beauty & Wellness” when you sell automotive parts gives you inappropriate design options.
Answer the questionnaire strategically
The tool presents a visual style selection screen with options like Classic, Modern, or Fun. Click the style that matches the approach you identified in Step 2. You can select multiple styles if you want to see more variety in your generated options, but picking too many creates inconsistent results that make comparison difficult.
Hatchful then asks where you’ll use your logo with options like online store, social media, merchandise, and business cards. Select all applicable channels because this determines what file sizes and formats the tool includes in your download package. Skipping “merchandise” means you might not get the high-resolution files needed for printing on t-shirts or promotional items.
Selecting more usage channels gives you a more complete file package without affecting the actual logo designs.
The final question requests your email address for download access. Hatchful sends your logo files to this address, so use an email you check regularly and won’t lose access to later.
Review and select your initial design
Hatchful displays dozens of logo variations on a grid after processing your answers. Each design uses different icon placements, color schemes, and layout arrangements based on your selections. Scroll through all options before choosing because the tool shows strongest matches first but sometimes better options appear further down.
Look for logos where your store name remains clearly readable at thumbnail size. Click any design to see it in a larger preview with mockups showing how it appears on business cards, social media profiles, and t-shirts. Pay attention to these mockups because they reveal legibility problems that aren’t obvious in the main grid view.
Select a design that balances visual interest with simplicity. Your chosen logo becomes the base template you’ll customize in the next step, so pick one with a solid foundation rather than trying to fix major layout issues through customization alone.
Step 4. Customize fonts, colors, and icons
After selecting your base design, Hatchful opens the customization panel where you adjust fonts, colors, and icons to match your brand. Click the “Customize” button below your chosen logo to access these editing tools. The interface shows your logo in the center with editing options on the left sidebar organized into sections for text, colors, and symbols.
Access the customization panel
The customization screen displays your logo larger than the selection grid, making it easier to see how small changes affect overall appearance. Three main tabs appear in the left panel: Name, Slogan, and Icon. Each tab controls different elements of your design without requiring you to start over or pick a new template.
Changes apply in real time as you adjust settings. Your logo updates instantly when you select a new font or color, so you can compare options quickly without saving and reloading. This immediate feedback helps you make decisions faster than traditional design software where changes require rendering time.
Adjust fonts for readability
Click the Name tab to modify your store name’s typography. Hatchful provides limited font options compared to professional design tools, but the selections match the style category you chose earlier. Scroll through available fonts and watch how each one changes your logo’s personality and readability.
Test fonts at the smallest size your logo will display. Type that looks bold and clear in the customization preview might become illegible when scaled down to favicon size. Avoid script fonts with thin strokes or elaborate decorative elements if your store name contains more than two words.
The best font choice stays readable when your logo shrinks to one inch wide on a business card.
Some fonts include weight variations like light, regular, or bold. Heavier weights improve visibility on busy backgrounds and print better on dark fabrics. At Dr. Tee’s Design & Screen Printing, we recommend medium to bold font weights for any logo that will appear on apparel because thin fonts disappear after washing or when embroidered.
Modify colors for brand consistency
The color section lets you change both your primary brand color and background. Click any color swatch to open a picker with preset options or enter specific hex codes for exact color matching. If you already use certain colors in your product photography or packaging, enter those hex values to maintain consistency.
Stick to two or three colors maximum in your Shopify logo maker design. Multiple colors increase printing costs and complexity when reproducing your logo on merchandise. Single-color logos also maintain clarity when reproduced in black and white on documents or faxed forms.
Swap icons to match your niche
Navigate to the Icon tab to view alternative symbols for your design. Hatchful shows dozens of icon options relevant to your business category. Scroll through all choices because icons appear in rough categories, and better matches often sit several rows down from the default selection.
Select icons with clean, recognizable shapes rather than detailed illustrations. Simple geometric icons scale better and remain identifiable at small sizes where intricate details blur together.
Step 5. Make sure it works everywhere
Your logo needs to perform across dozens of contexts before you commit to using it. The customization screen in the Shopify logo maker shows your design at one size on a white background, but real-world applications demand testing at extreme sizes and on various surfaces. A logo that looks sharp in Hatchful’s preview can become illegible when shrunk to 32 pixels wide or printed on a dark navy polo shirt.
Test at thumbnail sizes first
Open a new browser tab and search for any product on Amazon or browse Instagram on your phone. Notice how profile images and product thumbnails display at roughly half-inch squares on mobile screens. Your logo needs to stay recognizable at this size because that’s where most potential customers first encounter your brand.
Take a screenshot of your customized logo from Hatchful and paste it into any image editor. Resize the image to 100 pixels wide and examine what remains visible. Text should stay readable without squinting. Icons should maintain clear shapes rather than turning into blurry blobs. If your store name disappears or your icon loses definition, you need to simplify your design before downloading files.
Logos that fail at thumbnail size cost you clicks on social media and search results where first impressions happen in milliseconds.
Test your favicon specifically by saving your logo and uploading it as a browser bookmark. Open a browser window with multiple tabs to see how your 16×16 pixel favicon compares to other sites. Complex designs with multiple elements become unrecognizable at favicon dimensions, while simple logos maintain clear silhouettes.
Check backgrounds and color contrast
Place your logo on different colored backgrounds to verify it maintains visibility. Copy your logo image and paste it onto black, white, navy, red, and gray backgrounds using any basic photo editor. Your design should remain legible on both light and dark surfaces without requiring different versions.
Pay special attention to how your logo appears on fabric colors you plan to use for uniforms or promotional items. At Dr. Tee’s Design & Screen Printing, we regularly see logos that look perfect on white backgrounds but disappear completely on heather gray or navy t-shirts. Light blue text vanishes on white shirts. Yellow graphics fail on tan canvas tote bags.
Preview on physical product mockups
Picture your logo embroidered on a polo shirt pocket at three inches wide. Thin fonts and detailed icons create digitizing problems that increase embroidery costs or require design modifications. Intricate elements that look crisp on screen become distorted when converted to thread stitches.
Test how your logo appears on business cards by creating a mockup in any word processor. Set up a 3.5 by 2 inch rectangle and place your logo in the corner at realistic sizes. Business cards typically show logos between one and two inches wide, where poor font choices or crowded layouts become obvious problems.
Step 6. Export the right logo files and sizes
Downloading your logo from the Shopify logo maker gives you multiple file formats and sizes designed for different applications. The tool packages everything into a single ZIP file containing PNG, SVG, and JPG versions at various dimensions. Understanding which files to use where prevents quality problems when your logo appears on your website, social media, or printed materials.
Download your complete logo package
Click the “Download” button after finalizing your customization. Hatchful sends a download link to the email address you provided during the questionnaire. Check your inbox and spam folder if the email doesn’t arrive within five minutes. The download link remains active for 30 days, giving you time to access files even if you’re not ready to use them immediately.
Extract the ZIP file to see folders organized by usage category. You’ll find directories labeled Social Media, Website, Business Card, and other categories based on the usage options you selected in Step 3. Each folder contains logo files sized specifically for that platform’s requirements.
Understand which file format to use when
PNG files with transparent backgrounds work best for your Shopify store header, social media profiles, and any digital application where your logo sits on colored backgrounds. These files let whatever sits behind your logo show through, preventing ugly white boxes around your design. Use PNG files for email signatures, digital ads, and anywhere you need flexibility with background colors.
SVG files provide infinite scalability without quality loss, making them essential for large-format printing like banners, vehicle wraps, or building signs. Vector files maintain crisp edges when scaled from business card size to billboard dimensions. Save your SVG file in a secure location because you’ll need it for professional printing services and embroidery digitization at shops like Dr. Tee’s Design & Screen Printing.
Your SVG file is the most valuable asset in your logo package because it works at any size without pixelation.
JPG files work for basic applications like document headers or presentations where file size matters more than background transparency. These compressed files load faster in email attachments but include white backgrounds that limit placement options. Use JPG versions only when PNG transparency isn’t supported by the platform you’re uploading to.
Organize files for future access
Create a dedicated Brand Assets folder in your cloud storage or computer and move all downloaded files there immediately. Name the folder clearly with your store name and date, like “BlueRidge_Logo_Files_2026” so you can locate it years later when you need to send files to vendors or update your website.
Keep your SVG file separate in a clearly labeled subfolder called “Print Ready” or “Vector Files.” This prevents accidentally sending low-resolution PNG files to printers who need vector formats for quality reproduction. Store a backup copy in a different location like Google Drive or Dropbox to protect against hard drive failures or accidental deletion.
Save the original Hatchful download link email in a folder you won’t delete. If you lose your local files or need to re-download different sizes later, that link provides access to your complete package without recreating your design from scratch.
Fix common Hatchful issues and limitations
The Shopify logo maker delivers fast results but comes with built-in constraints that sometimes block your vision for your brand. You might pick a base design only to discover the customization options don’t go deep enough to create what you imagined. Understanding these limitations before you invest hours tweaking designs helps you decide whether to push forward with workarounds or switch to a professional designer.
When fonts don’t match your vision
Hatchful restricts you to pre-selected font pairings within each template category. You can’t upload custom fonts or access the full Google Fonts library like you would in design software. If the available options don’t match your brand personality, pick the closest alternative and compensate with stronger color choices or icon selection.
Store names with more than three words create spacing problems that Hatchful can’t always solve elegantly. The tool automatically adjusts text size to fit your name within the template, which means longer names appear in smaller, harder-to-read fonts. Consider shortening your store name to an abbreviation or removing unnecessary words before generating logos.
If your store name forces Hatchful to shrink text below comfortable readability, your name might be too long for effective branding.
Work around limited customization
Template-based tools like Hatchful mean hundreds of other stores might use similar design elements as your logo. You can’t upload custom icons or add unique graphic elements that differentiate your brand. To minimize this problem, choose less common color combinations and swap default icons for options deeper in the symbol library that other users skip.
The tool locks you into its layout structure without letting you adjust spacing, icon placement, or text alignment beyond preset options. If your chosen template puts elements too close together or creates awkward balance, select a different base design rather than fighting with limited controls. Hatchful works best when you adapt your vision to available templates instead of expecting templates to bend to your needs.
Fix resolution and quality problems
Downloaded PNG files sometimes appear pixelated when enlarged beyond their intended dimensions. Use the high-resolution versions in the “Print” folder for anything larger than four inches wide. For printing on apparel or promotional items, provide your SVG file to the printer instead of relying on PNG exports.
Colors in your downloaded files might not match exactly what you saw in the Hatchful preview due to screen calibration and color space differences. Write down the hex color codes from your customization screen and provide these to printers or web developers who need precise color matching. At Dr. Tee’s Design & Screen Printing, we convert hex codes to thread colors or Pantone matches to ensure your logo appears consistently across different materials.
You cannot re-edit your logo after downloading without starting over from scratch. Hatchful doesn’t save projects or let you reload previous designs for modification. Screenshot your customization settings including font names, color codes, and icon selections before downloading. These records let you recreate your design if you need to make changes later.
Next steps
Your Shopify logo maker design is ready to use across your store, social media, and marketing materials. Upload your PNG files to your Shopify theme settings, replace default favicons with your 32×32 pixel version, and update all social media profiles with consistent branding. These digital placements take minutes and immediately improve your store’s professional appearance.
When you need that logo printed on uniforms, promotional items, or business cards, the quality of your file reproduction matters as much as the design itself. Professional screen printing and embroidery require proper file preparation and color matching that template-generated logos sometimes complicate. If you’re in the Kansas City area and need your new logo printed on apparel or merchandise, our team handles everything from file preparation to final garment delivery, ensuring your brand looks as good in person as it does on screen.
